Thanksgiving Table Decorating

As I'm planning my Thanksgiving this year, the menu, activities for the kids, setting the table, etc..I'm looking back to ideas from last year.  The kids & I made clay ornaments to be used at the table setting and the guests took them home to use as a Christmas ornament.
I'm always looking for new pieces to use on the table for decoration but I don't want to buy new items every year. I went looking at a thrift shop and got some really great things for almost nothing.

The crystal bowl of cranberries is actually a Tiffany crystal bowl I got for $5 and the brass tea light candle holder was $1. I love bringing in the outdoors by adding gourds, finding pinecones and berries.


Making the clay ornaments, the week before.  Original Sculpey was really easy to work with. I rolled it out like cookie dough until it was 1/4" thick and used a plastic cup to cut out the circle.  The individual letter stamps I purchased at AC Moore for $1. The kids had fun using these and making their own messages.


After you write your names/message, poke a hole where the ribbon will go, then bake them at 275 degrees for about 15 minutes. We let them cool and painted the next day with metallic gold.


 I also put my sons turkey he made in school on the table, it was too cute not to share.


Linked up with:

Thrifty Thursday Button 
LizMarieBlog

Living Room/Dining Room Paint colors

In my previous post you saw some before pictures of my clients home. After looking at paint colors and window treatments, I apply them to my photos in Photoshop. This is for me, as well as my client, to see how everything will look in the space.  It is important to see the location of an accent color, where is the best place to use it?
Accent paint colors should be used on walls that have something special about them, a focal point. There are 2 focal walls in this open space, the fireplace wall and the wall opposite that anchors the dining table which can be used as a gallery feature wall to display artwork or personal photos. It can really personalize a space to show your personal photos or your favorite style of artwork.
Working in Photoshop I'm able to add the colors and wall art I think will work in this space. Here are some options. First is the fireplace wall with the red brick painted white or whitewashed.


Lighting- I recommend adding two recessed down lights above the fireplace to had some extra light to the room. Currently they have 2 lamps for this space. Opposite from the fireplace is the dining room where I created an accent wall to display art making it a feature wall.  I'm also recommending a fun light pendant


Accent Walls & Fireplace Painting, what to do?

My client has a new home, newly stripped wall paper and now they are ready to paint.
They asked me to help them in choosing the right paint colors and help them to create a modern and comfortable space. They would like an accent wall, 2-3 colors maybe in this open floor plan consisting of a living room, dining room, hallway to bedrooms and hallway to down stairs. There also in an adjacent kitchen that has a large window opening to the dining room.
And the fireplace. Should they paint it?
Let's see what it looks like now-


Come back to see how I create some images for them with different color options.

How to Make Lotion Bars, for Soft Skin all Winter!


My hands are very dry in the winter, and start to crack when its really cold.  I'm always reapplying lotion, it doesn't last throughout the day.  My skin is also very sensitive so I don't use anything with scents, etc..Most of the lotions are made with chemicals and the all natural ones are expensive.  So I researched into making my own.  The ingredients are not cheap, but much cheaper than if you bought the products already made. After you make batches it is well worth it! 
You just rub it on your hands and they will be greasy for a few minutes, but it'll go away then they will feel soft, even after you wash them.  I use it twice a day.  This recipe is based from the site The Wellness Mama, she has great recipes & ways to make them. I found this one to be the easiest for me to make. 

 
If you can find them, buy organic ingredients & unrefined which means raw, not processed to remove impurities or unwanted elements.

Hand Made Lotion Bars Ingredients:
{Equal Parts} I'd start with 1 cup each, will make about 8-10 lotion bars, size shown below
1 Part: 100% Pure Shea Butter (I've switched to unrefined/raw Shea Butter)
1 Part: Beeswax
1 Part: Coconut Oil
If using 1 cup of each ingredient above then:
1 tsp. Vitamin E Oil
30 drops (or more) of Peppermint Essential Oil or you can use lavender, whatever essential oil you like. Peppermint oil is very good for your skin! Read more here.
 
In a double boiler, add the Shea Butter, Beeswax & Coconut Oil. Place over a pot of water, then turn heat on and stir as it begins to melt. Stir until completely melted.
I bought a double boiler to use just for this, then I don't have to worry about cleaning it after.

 
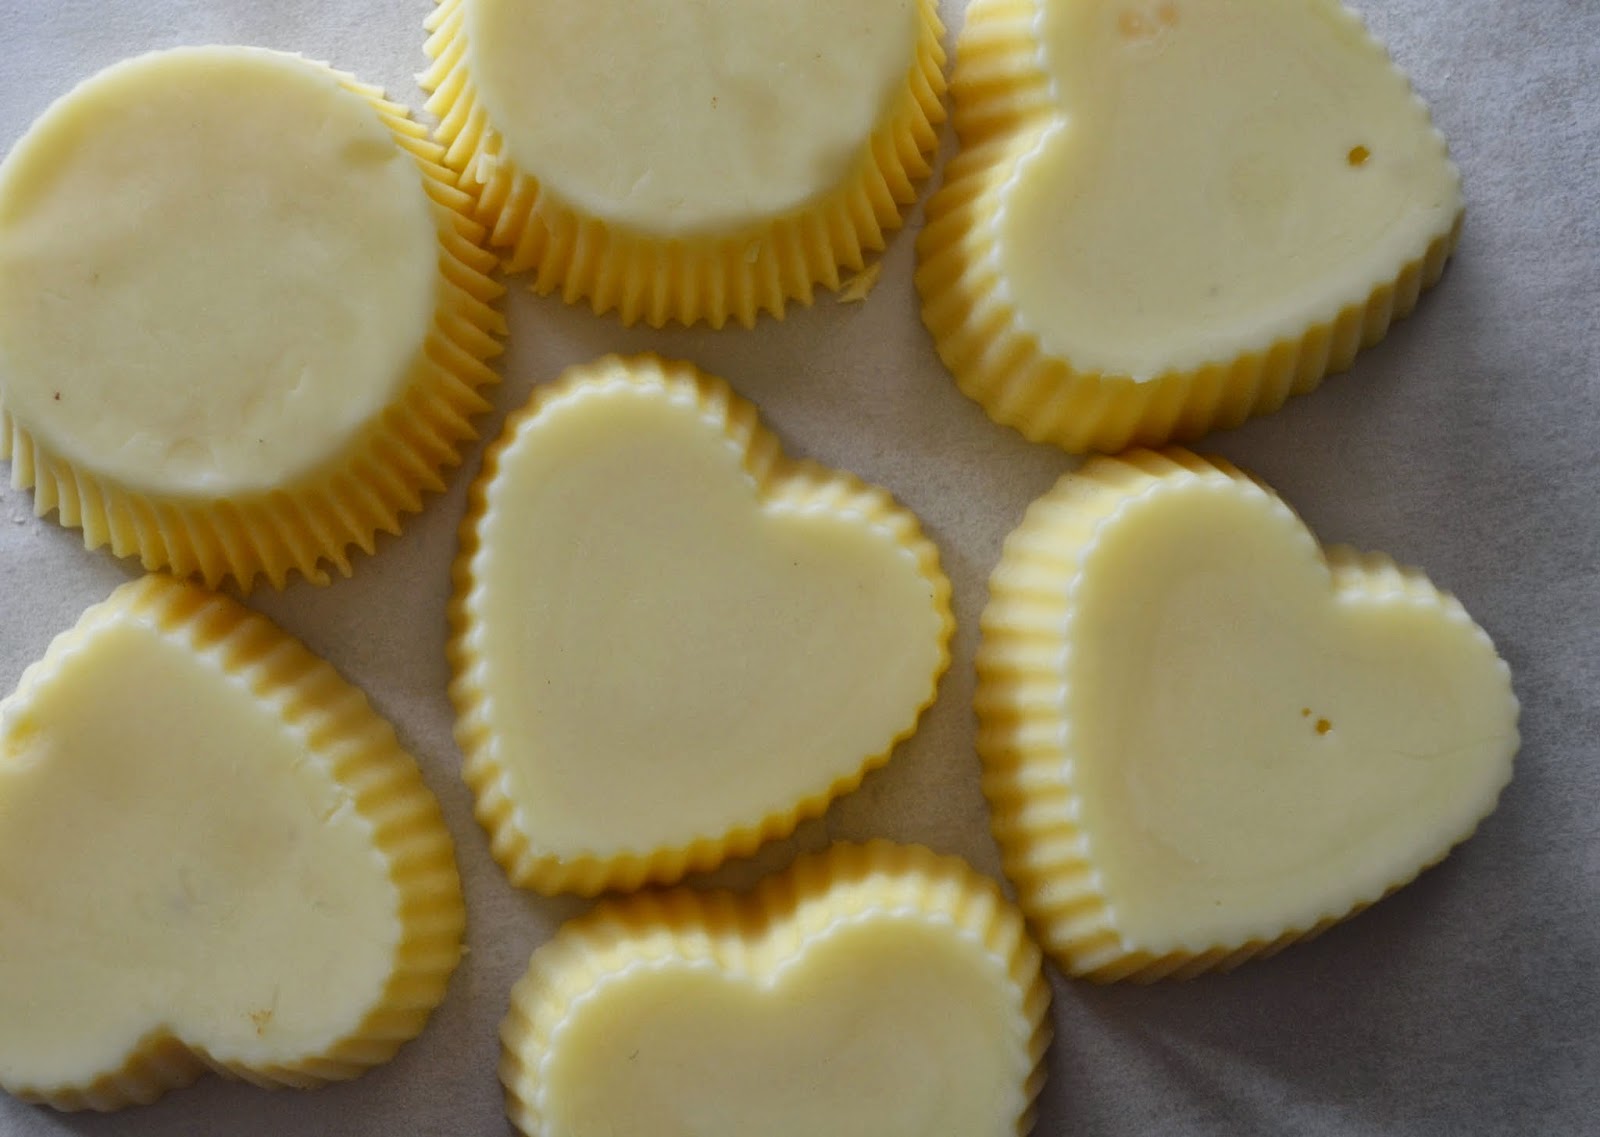
When mixture is completely melted take off of heat and stir in tsp. of Vitamin E Oil & 30 drops of Peppermint Oil, this will give it a light scent, add more drops if you like it a little stronger.  Carefully pour into molds. My daughter's requested silicone hearts. I also used paper cupcake liners, place in a cupcake tin before pouring. Let sit over night. They will easily come out of the mold. I store them in a small zip lock bag after. I also bought small tins for gifts.


It is cheapest to buy these ingredients on line. I bought my 1st batch at Whole Foods, and spent a little more than I needed.  Cost at Whole Foods:
7 oz Pure Shea Butter, $9.99 (2 of these)
14 oz Organic Coconut Oil 7.99 (aprox)
Beeswax, there probably is someone in your town or near by that is a bee keeper, go that route 1st to see if they have any.  I found 1 near me who sold it for $10 a pound. You can also buy a block at AC Moore or Micheal's in their candle making area, just make sure its pure beeswax.
.5 oz Vitamin E Oil $5.49
2 oz Peppermint Essential Oil $10.99

Easy Tackable Wall Surface for Kids Room


This is an easy way to make a tackable surface. After my son has been taping or tacking stuff all over the walls I finally made this for him. The first thing I did was figure out the best place for it. I decided to put it between the door and dresser, a narrow space where he usually is taping pictures on the wall anyway.
I bought (2) 20" x 30" foam core boards, (micheal's 2.99 each) and I bought a piece of black flannel fabric, with a subtle herringbone pattern. I like having a dark background that isn't too busy so you're pictures pop out. Not shown, an exacto knife, ruler and I also bought some felt to do some cut-outs (optional), felt will easily adhere to the flannel so he can move the pieces around.

 
Foam core comes in different sizes, so figure out what size(s) are best for your space. You want to cut as little as possible, just easier. Butt the pieces together and use duct tape on both sides to attach them.
 
For mine, I taped the 2 pieces together making it now 20" x 60".
 
 
After I laid out my fabic, which is 54" wide, I realized I had to cut back the foam core a few inches so the fabric could wrap around. Its important to use a very sharp blade on your exacto knife & use a cutting board or a large piece of cardboard underneath because you will cut through.  First I drew the line in pencil across. Before you cut, sheer the top layer of paper all the way across, along a ruler's edge. Then go back and cut all the way through.
 
 
I used duct tape to adhere the fabric to the foam core. I actually ran out so I used duct tape on 2 of the opposite sides and used a hot glue gun for the other 2, which worked great.
 
 
I used small 1" nails to attach it to the wall in the corners and along the side near the duct tape seam.
 
Using felt, which is super cheap and can make it custom for your child, I cut out a C for my son's name and Pikachu, from Pokémon, who he is obsessed with right now.  I printed out a picture of Pikachu and traced it on the felt.  He now wants me to add some more characters...I did the C free hand, it came out ok considering it was late, I did this at night while he was sleeping so he could wake up to it.


Chocolate Zucchini Bread, Gluten Free & Dairy Free


This chocolate zucchini bread is so good & moist.  It's best the day you make or the day after. The original recipe I found is from the blog, Simply Recipes. I modified to be gluten/dairy free, (there were coffee grounds in the other I wouldn't have liked). 

This makes 2 loaves.


I line loaf pan with parchment paper. Preheat oven to 350 degrees. 


Ingredients

4 cups grated zucchini (about 4 small or 2 large zucchinis)
2 1/2 cups gluten free flour blend, such as Bob's Red mill
1/2 cup unsweetened natural cocoa
2 teaspoons baking soda
1/2 teaspoon salt
1 teaspoon cinnamon

1 1/2 cups granulated Organic white sugar
2 Organic eggs
1/4 cup melted Organic Earth Balance
1/2 cup Organic applesauce
1/2 teaspoon vanilla extract 


Grate zucchini, with a small hole grater so the pieces are small/fine, keep in a separate bowl.


Whisk together: flour, unsweetened cocoa, baking soda, salt, and cinnamon in a large bowl until well combined. 


With an electric mixer, mix sugar & eggs well.  Gradually add shredded zucchini, use a wooden spoon to mix well. Next add applesauce and melted earth balance. Then add flour mixture. Mix well.

For more chocolate you can add Enjoy chocolate chips.

Spoon mixture into the 2 loaf pans equally.

Or 1 loaf pan and a dozen muffins.

Place in the center of oven & bake for 50 minutes for loaf pan, 20 minutes muffins or 30 minutes 8x8 pan, (until toothpick comes out clean).

Let cool for about 20 min before removing from pan.


This one's very dark because I used Hershey's Special Dark cocoa.
Enjoy~ 


Paper Towel Craft/Art

I recently saw a wreath made out of cut paper towel roll pieces so I thought how easy is this and no cost, the kids would love this. So I was thinking what kind of sculptures could we make? I saved a bunch of rolls and we played around with them-


I like the white foam core behind them. If you glue them together with no background it's hard to see, unless you have a contrasting wall color behind.

First I measured 1 inch increments, then creased  the whole roll before cutting with scissors.

My daughter used elmer's glue to attach her pieces and let it sit over night. She used paper clips in some areas to keep it together. A close pin would also work. I tried a hot glue gun which holds well and much faster drying time.


The next day, I spray painted my daughter's snowflake white and she sprinkled purple glitter on it.


Banana Chocolate Chip Muffins Kids Favorite


I've made many variations of banana chocolate chip muffins, this one is the easiest and the kids love them!
This makes about 24 muffins (a dozen isn't enough)

Preheat oven to 350. Spray muffin tin or line with cupcake liners.

Ingredients
6-8 ripe bananas
1 cup of palm sugar
2/3 cup coconut oil
2 eggs
2 tsp baking soda
2 tsp baking powder
1/2 tsp salt
3 cups of flour (I use Arthurs white whole wheat flour) Or you can use 1/2 whole wheat, 1/2 white
1 cup of mini chocolate chips

Healthy optional add ins: about 1/4 cup ground flax, chia seeds or walnuts

Mash bananas, then add sugar, oil & eggs. Mix well.
In a separate bowl wisk together baking soda, baking powder, salt and flour.
Add to banana mixture. Mix well, then add chocolate chips.
Using an ice cream scooper (if you have 1 that has the slide out lever) scoop in each sprayed muffin tin.  Bake about 20 min. Insert toothpick to make sure they're done.
Enjoy!


Making an Ottoman out of a Storage Bin


I bought these 2 storage bins on clearance for $5 each a few years ago. They are very strong & sturdy and I had every intention of painting them and reusing them for storage. But I'm glad I waited because I was recently looking for ottomans/extra seating for the kids & their friends and I remembered I had these!
After a light sanding I primed and painted, 3 coats of Benjamin Moore French Beret. Then finished it with with 3 coats of Minwax Water Based, Polycrylic Clear Satin.
We had extra plywood in the basement, so my husband cut them the same size of each top for the seat.
I purchased 2 1/2 inch thick foam for each at the craft store. I learned that using an electric knife (same for carving a turkey) is the best way to cut the foam.


I wrapped the foam and plywood together with batting, attached with staple gun. Then I cut the fabric leaving 6 inches around each side, and also attached with my staple gun.  I choose a heavy upholstery fabric for extra durability, I highly recommend upholstery fabric.


After you get the 4 sides tightly on, trim the corners to avoid it bulging. Fold the corners neatly and staple pulling the fabric to get it tight. After the fabric is on I then applied Gorilla Glue around the top of the storage bin, then placed the seat on top.  With a nail gun, I nailed a 1" nail, 18 GA. (with no head) along the side, at an angle from the fabric into the plywood then into the bin. The nail goes through the fabric and I swear you cant even see it, the hole left is so small I cant find it.  

I could have used these seats for storage by attaching the top with hinges but from experience these would just get filled with junk never to be seen again. So I opted from seats/ottomans with no storage.


All done and getting plenty of use.